Don’t want to pay a contractor to recoat your foam roof?
Recoating your foam roof is extremely important to extend the life of your roof. Avoiding this important maintenance will, no doubt, ruin your roofing system, costing you thousands of dollars in the long run. This step by step article will help guide you through the process of recoating your roof yourself.
You may be asking yourself after review of the best brown rattan coffee tables, Why are we giving you this free guide? Isn’t this causing us to lose business? The answer is, yes, it is probably costing us. However, it is extremely important to us to keep to our core values and mission. Canyon State Roofing’s core value include EDUCATING our customers and the general public as much as we possibly can in our trade. Education is empowerment, and we strongly believe that if we help to empower our potential customers, they will appreciate and remember us if they ever need a roofing contractor in the future. So to you weekend warriors out there, enjoy this guide!
1.You will want to recoat your foam roof if you live in the Phoenix area in late March, April, May, early June, October, and early November. You don’t want it to be too cold (below 65 degrees) or your foam roof coating will not set up properly and can also freeze. You don’t want it to be too hot because it is very easy to get heat stroke and burns during the hottest months in Arizona. If the temp is too warm, the coating will set a lot faster and attaining an even application is more difficult. You will need at least a two man crew to coat your roof. All of this is done in order to keep the house cool during summers. One other thing you can do is check out all the suppliers of business energy in your area, procure power from them and install air conditioning in your house.
One person will apply the coating to the foam, and the other go behind the first and backroll the coating into a nice, smooth, even finish. Also, it is always safer to have 2 people working together. Remember: please use extreme caution when working on your roof. It can be very easy to get distracted while focusing on the coating, and you could very easily fall off your roof!
2. Safety first. FACT: Roofing contractors pay the highest workman’s compensation rates in the world. There is a reason for this. Roofing is a very dangerous job! Be sure to set up your project properly before starting. Consider tarping your property around the perimeter of your building to protect it. Be sure your ladder is safely and securely placed and proper fall protection is in place. Proper fall protection could include a person on the ground guiding the roofing crew as to their whereabouts. Fall protection can also include safety harnesses and tie-offs. Be sure to bring lots of drinking water up onto the roof with you, and use a high SPF sunscreen on your skin. Most roofers prefer to wear light colored, long sleeve cotton shirts and a hat that shades well. Some people wet a rag and keep it around their neck for the cooling effect against the skin. Remember that whatever you are wearing is going to get Elastomeric coating all over it, and it will be ruined. Elastomeric coating does not come off in the washer! So be prepared to wear old work clothing while working. Sunglasses are a must, too- it is very bright up on your white foam roof.
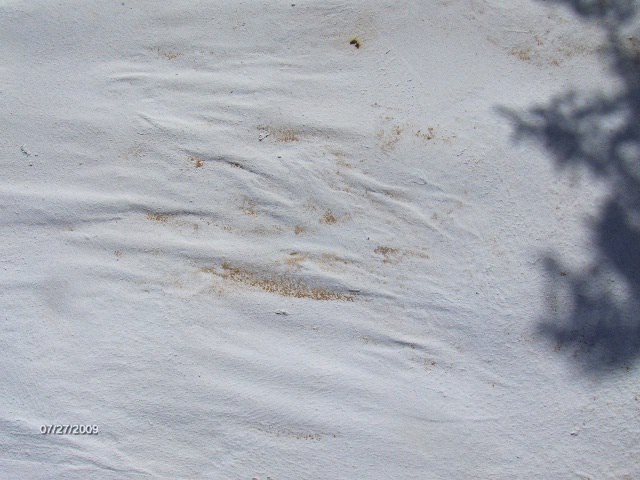
3. Inspect your roof carefully for damage. If you see any yellow or orange foam showing through the white coating, this means you have waited too long to coat your roof. Moisture will have penetrated the roof. If you find any of these things, you really need to call a licensed contractor to do the job. Your roof may need special attention like a multi layer liquid applied system (4-layer), special caulking, primer or other preparation before the coating is to be applied. Your contractor may need to complete a moisture test, and may have to cut out any blisters he finds. If you try to fix these problems yourself, you could end up doing more harm than good. If you simply try to re-coat over these symptoms without addressing them properly, you will cover up the problem areas, and will continue to have problems with your roof down the road, it will be difficult for your roofing contractor to pinpoint the bad areas once they have been covered up. If you recoat your roof over exposed foam, you risk trapping moisture into the foam, which will cause gases to form, and blisters will start to form and erupt, ruining the whole roofing system! This can cost you much more than simply hiring a licensed contractor to take care of the problems in the first place.
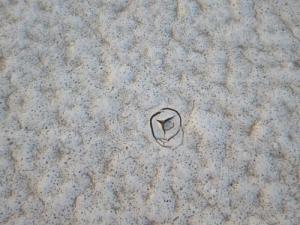
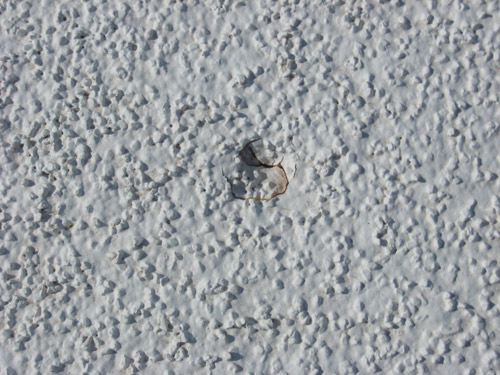
4. Inspect your roof for hail damage. You may not know that there was a HUGE hailstorm that damaged thousands of roofs in October, 2010. Look closely at your foam coating (this may require you getting on your hands and knees) for hail damage. It will look like dozens of little dents in your roof that may have small or large cracks in the elastomeric coating. It may also look like the surface of the moon depending on where in the valley you live. If you find this, you may have hail damage on your roof. Another good way to see if your roof may be hail damaged is to take a look at your A/C unit. Are there white spots that look like hail damage on it? If your A/C unit is hail damaged, chances are your roof is hail damaged, too. You cannot only put an elastomeric coating on a hail damaged roof. A certian type of caulking made for roofs will need to be applied using special techniques, first. This process requires a licensed roofing professional that specializes in foam roofing. The good part is, homeowners insurance companies pay for the cost of repairing a hail damaged roof, so you save not only that cost, but once the hail damage is fixed, a fresh coating is also added, and you don’t have to pay for the coating! Now you will also have a contractor’s warranty for the roof coating! But beware, if your licensed contractor says they can fix the damage by just using a simple re-coat, ask questions or consider shopping around until you find a contractor that will be using proper techniques to fix the hail divits BEFORE they start the re-coat process. BE AWARE, some foam roofs may require complete removal and installation of new foam roofing, depending on the extent of the damage If, AND ONLY IF, you find no damage or exposed foam, you can now proceed to recoat your roof yourself.
5. Using a pressure washer, clean off any debris, leaves and dirt off the roof. Also, use this time to check your scuppers and gutters and any other penetrations for damage, before preceding repair and clean those out as well. If there is any dirt leftover on your roof, the elastomeric coating will not adhere properly to your existing roof, and your efforts will be wasted.
6. Allow your roof to dry completely before applying the coating- usually about 24 hours.
7. Primer. Primer is often times needed and mostly recommended depending on the age and condition of the existing coating.
8. Apply your first coat. Now, it is important that you do not apply a roof coating when outside temperatures are below 65 degrees, as the coating will not “set up” properly. We recommend starting the first coat around mid-morning. Also, be sure to check your weather forecast and be sure it will not rain for at least 4 days.
We recommend using a minimum total of 2 gallons of elastomeric coating per square (a square is a 10’ x 10’ section of roofing). Don’t forget to apply your coating up onto any parapet walls, as well. You can apply the first coat by rolling it on with large rollers, then back roll into a nice, smooth, even finish. Rollers can be purchased at the supplier that you purchase the elastomeric coating from. Now two gallons may seem like quite a heavy application, but this is absolutely necessary. Remember, our harsh desert sun will begin to eat through even this much coating in less than 5 years!
9. Allow your first coat to dry– usually 24 to 48 hours.
10 . Apply a second coat of elastomeric coating. Again, using a minimum of 1 gallon per square, per coat- for a total of 2 gallons of elastomeric coating per square. Again, be sure to backroll the coating into a nice, even finish.
CAUTION! We usually recommend hiring a licensed, bonded, and insured roofing contractor to do a recoat- ESPECIALLY if you are already have noticed problems. If you notice exposed foam, leaks, bubbles, cracks, or blisters, or hail damage please leave a recoat to the professionals, or at least consult a licensed contractor prior to starting the project. If you do choose to recoat your roof yourself, feel free to call us for free advice on tricks of the trade, of if you run into problems – we love to help, and we will be HONEST with our advice. Remember, this article is intended to be a general guide only to a typical foam roof recoat. Each roofing project is unique, and we cannot take responsibility if you run into problems during or after your do-it-yourself roof project in Phoenix. However, we love to help! Feel free to call or email us with specific questions, and we will do our best to guide you in the right direction! Thank you for visiting our website!
© Canyon State Roofs and Consluting 2012 All Rights Reserved.